
How to Fix a Leaky Roof
If left unchecked, even a small leak can lead to mold, rotted wood, destroyed insulation and ugly ceiling stains. Start by examining the outside of your roof for penetrations, holes or disruptions in the surface.
Also, look around for cracked or corroded flashing, especially around chimneys, vent pipes and dormers. Click here to be connected to your local Owasso Roofer today!
1. Look for Damaged Shingles
A roof leak is not only a serious problem for your home’s structure; it can also cause water damage to the inside of your house, including mildew and mold. The first thing you should do when a roof leak develops is inspect the ceiling for water stains, which are the most common indicator of a leaky roof. If you see any stains, you should call a local roofer immediately to assess the situation and make necessary repairs.
The shingles on your roof are a vital protective layer that covers the exterior of your home, so it’s important to make sure that they are in good condition. If you see any damaged shingles, they should be replaced as soon as possible to avoid water leaks. You can repair shingle leaks with roof sealant, but this is only a temporary solution and won’t last as long as replacing the shingle with a new one.
When assessing the state of your shingles, look for curled and swollen ones. These are signs of rot and may be the source of your leak. You should also check for bare spots on the roof. These are usually caused by water leaking under the shingles and can lead to further problems if not addressed right away.
If you spot any bare areas, you should apply a coat of roof sealant to the area. This will help to prevent further water leaks and keep the rest of your shingles protected.
You should also examine the flashing around your skylights, chimneys, and vents. Cracks and tears in the flashing can also allow water to enter your home. It’s a good idea to get the flashing repaired as soon as possible to avoid more expensive roofing repairs in the future.
If you spot any shingle leaks, you can use a roll of roof patching material to make a quick fix. This is available at most home improvement stores and costs between $10 and $20. You should also lay down a bead of sealant along the glue strip on the base of your new shingle to ensure that it stays in place.
2. Check the Flashing
Flashings are strips of metal that connect the corners, ridges, and edges of your roof. They are designed to create a watertight seal around chimneys and skylights, as well as the areas where different slopes of your roof meet. However, they can become damaged due to inclement weather or simply from age and wear. The best way to check the flashing is to crawl up in your attic and take a look. Look for rust, dark spots, or any other signs of damage.
You should also check for areas where moisture is collecting, such as puddles or mold growth. If you see any of these problems, it is time to start planning your repair project.
The most common cause of a leaky roof is flashing issues, especially in areas with heavy rain or snow. Over time, the metal flashing can corrode, leaving your home vulnerable to water penetration. When this happens, your attic and walls can suffer from severe damage, and mold and mildew will likely grow in the affected areas.
Leaks can also be caused by poorly installed shingles or by flashing that has been exposed to the elements for too long. In addition, tiny holes in shingles can lead to rot and other problems if they are not repaired. Check for these small holes and replace any that you find.
Another common leaky roof problem is a cracked or worn neoprene pipe boot. This is usually a result of years of exposure to the elements, such as wind, sun, and ice. The leaky area will typically appear around the top of the pipe, near the flange. To fix this issue, you can purchase a rubber collar that will encase the existing flange.
Once you have located the source of your leak, make a note of it. This will help your roofers pinpoint the exact location of the leak when they come to inspect your home. If possible, mark the spot with a piece of chalk or some other easy-to-see marker. This will help ensure that your roofers can get to the site of the leak quickly and efficiently.
3. Check Your Attic
After locating the water damage, it’s important to figure out where the leak is coming from. This will help you determine if it is from the roof or a plumbing issue in the home. Water from a leaking roof often travels to the attic before it hits the walls or ceiling. Once it gets in the attic, it can rot insulation and weaken support joists. Water in the attic can also cause mold and damage to stored items. It’s important to limit the amount of water damage by placing buckets and tarps in the attic.
Getting in the attic with a flashlight and looking for wet spots can help you locate the source of the leak. It’s best to do this during a rain storm, as the water will be easier to see. Be sure to look around vent openings, skylights and any areas where the attic meets the roof. Also check for wet spots in the attic, rotting wood and mold.
Once you’ve found the spot where the water is leaking from, mark the location on your attic floor. This will help your roofers know where to start when they come to fix the leak. Having the information about the leaky area can also save you money, as you may not need to pay for as much interior repair work.
Once you find the source of the leak, it’s important to have it repaired as soon as possible. Even small leaks can lead to major problems, such as mold, rotted framing and sheathing, destroyed insulation and water stains on the ceiling. By having a leaky roof fixed right away, you can prevent the problem from worsening and save yourself a lot of time, effort and money in the long run. For a more permanent solution, you can opt for a waterproof roof sealant. The most popular of these is Flex Seal, which comes in a liquid form to simplify the application and will remain flexible in all weather conditions. This is a good alternative to caulk, which can crack and dry out over time.
4. Check Your Ceiling
It's important to address ceiling leaks as soon as you spot them, since water damage can quickly lead to structural problems, mold, electrical issues and other costly consequences. Many of the necessary steps are within the realm of do-it-yourself capabilities, though a professional may be needed for some specialized repairs, such as plumbing issues or extensive roof damage that would require structural repair.
Start by taking preventative measures to limit the extent of the damage. Move anything that could get wet, such as furniture or rugs, out of the splash zone and keep it off the floor until you've had a roofer inspect the problem. This will protect them from permanent water damage and reduce the risk of mildew or other issues that can arise with wet rugs and carpets.
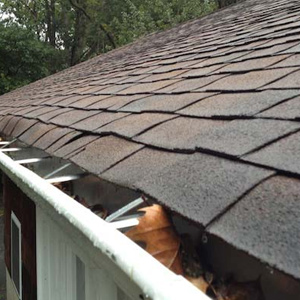
If you've noticed that the leak only happens when it rains, try cleaning your gutters to see if that fixes the problem. Clogged gutters can cause draining rainwater or melting snow to back up under flashing, where it can drip down on the ceiling.
Once you've taken preventative measures, it's time to locate the source of the leak. Grab a flashlight and head into the attic, making sure to use a ladder with secure footing and extreme caution. Then, walk around the attic with your flashlight to look for discolorations or water stains on the roof sheathing or rafters. Water will always flow down, so the stains will show you the general area of where the leak is coming from.
If you can't find the source of the leak, it might be a good idea to remove a few shingles in the suspected area and check the sheathing underneath. Sometimes, a leaking shingle will push water down to the sheathing, which will show up as a dark stain or even rotted wood. Then, it will be easier to find the source of the leak. Once you've found the source, you can replace the damaged shingle and re-caulk the area. Visit www.owassoroofer.com for professional help today!
If left unchecked, even a small leak can lead to mold, rotted wood, destroyed insulation and ugly ceiling stains. Start by examining the outside of your roof for penetrations, holes or disruptions in the surface. Also, look around for cracked or corroded flashing, especially around chimneys, vent pipes and dormers. Click here to be…